I saw this “make a skeleton” panel by My Mind’s Eye and I fell in love! What a fantastic idea!!! I had seen it in several shops where they followed the directions of sewing the panel to backing fabric with right sides together and then stuffing the parts and assembling it to form a 3D skeleton. They are adorable.
This cutie was posted by the Hartland Quilt Shop in Hartland, Michigan. Isn’t it cute???
BUT then I got to The Yardgoods Center in Waterville, Maine and saw something BRILLIANT! My friend Jan Frost had just quilted the panel and cut it out. DUH! It was awesome. When I saw it she had it safety pinned together. . . not sure how she is planning to finish the joints.
I quilted mine using a cobweb design from Intelligent Quilting and cut it out with one of Olfa’s Pinking Rotary Blades. OH MY GOODNESS. If you don’t have one of these YOU NEED ONE OF THESE!!! It was awesome and I saved my hand from the evil pinking shears. There is an affiliate link below. . .
I made the joints with buttons. There may have been a fair amount of discontent at that time because I really stink at hand sewing. It is amazing to me how many different mistakes I can make sewing a button. Stunning, really.
I made a YouTube video showing the process- it is about 5 minutes long. Go watch the video and don’t forget to like and subscribe to my channel!
My husband was the CEO of a civil engineering firm. There were only two jobs at the firm that I thought even sounded interesting- one was graphic designer to put together proposals and the other was CAD tech. I actually did a few proposals for the company with my freelance graphic design skills but the whole notion of Computer Assisted Design has always intrigued me. Only recently did I think about the fact that I have been doing CAD Quilting for YEARS!!!!
One of my favorite quilt design tools is called Electric Quilt 8. I was teetering on the edge of buying EQ7 and when EQ8 came out I bought it right away. EQ8 has a HUGE library of blocks and “fabrics” that you can use to design quilt blocks, traditional block based quilts and even more modern quilts. Although I hardly ever use manuals, I did purchase the manuals for EQ8 and I went through them pretty religiously at the beginning which has helped me immensely over the years. If you are interested in designing your own quilts or in playing with color more, this is the program for you. It is available for $239.95 from the Electric Quilt Company.
(These are affiliate links. It does not cost you any more to use these links, but I will receive a small percentage of the sale which helps keep this blog online!)
I know some of you have EQ8 already but aren’t sure how to use it. . . I just started working on putting together a class for you that will include how I combine my images from EQ8 with Pro-Stitcher Designer to plan out my quilting! Make sure you subscribe to my newsletter so that you don’t miss hearing about the class!
Another tool that I use more and more often- and especially with my more modern quilt designs- is Adobe Illustrator. The Adobe products are available as a subscription based on how many of their products you use. Most Quilt Designers are using Illustrator only, but I also use InDesign to write my patterns and PhotoShop when the need arises. I have been a PhotoShop user for so many years (20+) that sometimes I just revert to doing things there.
I am a longarm quilter and my Handi Quilter machine is set up with a wonderful computerized quilting system called Pro-Stitcher. This program allows me to set up the area of my quilt, fill it with a design, crop the designs so that they fit my area exactly and stitch on the quilt. Yes, there is a bit of a learning curve, but anyone who really wants to learn is capable of mastering these techniques. As a Handi Quilter National Educator, I travel the country teaching people how to use Pro-Stitcher and you can always book a class with me!
Pro-Stitcher also offers another program called Pro-Stitcher Designer that allows you to edit digital designs and to make your own digital designs to be used with Pro-Stitcher. It blows my mind that I can create a design while sitting on my couch, load it onto a thumb drive, put it on my Pro-Stitcher tablet and be quilting away in just a matter of minutes. It is a lot of fun!
I know a lot of people are using Canva to make quilt patterns, but I haven’t “gone pro” because I already had the Adobe Suite which is kind of the gold standard of design programs. I do use the FREE version of Canva quite a bit for posting on Social Media.
Those are the CAD Quilting programs that I use EVERY SINGLE WEEK. I am sure that there are some more programs out there. Let me know in the comments!
Would you like more in depth descriptions of how I use these programs? Let me know!
DISCLAIMER: The photos in this post are taken from #IFAQH. They are hearts that have already been found. I don’t want anyone to know what the ones I make look like!
Quilted Hearts shown on the I Found a Quilted Heart website.
In the past few months I found a cool charity project that I want to share with you. Quilters are amazingly generous people. We often hear of people donating quilts to the Ukrainian refugees or to victims of natural disasters. I was recently the recipient of a donation of some USMC uniforms from a fellow Marine Mom to make something special for my son and I feel her love each time I look at those uniforms. I will share that project eventually- it is still in my head working out the bugs.
Anyway, this is a very simple project. People make small hearts out of fabric and leave them in public places where others can find them. It is a way to show a little love and kindness to a stranger.
And the stories are amazing.
I hope you will go to the website www.IFoundAQuiltedHeart.com and learn more about the project if you are interested. They also have a Facebook group that is pretty active and a feed on Instagram. Because I know you might not follow the link. . . here is some information.
There ARE rules.
Do not hand, give or gift hearts to people. (Hearts need to be “found.”)
Do not leave hearts on personal or private property, such as a front porch, vehicle, door, bicycle, mailbox, gate, little libraries, etc. (Not public)
Do not leave hearts in a cluster, like a giving tree. (Not random)
Do not leave hearts in places that are not public: hotel rooms, work desk, break rooms, office, private retreat, etc. (Not public )
Do not leave hearts inside any kind of retail store or on retail displays. (Can be mistaken for merchandise.)
Do not leave hearts in airports. (Homeland security does not approve!)
Do not leave hearts in National Parks, Wilderness, Forests, Monuments, Bureau of Land Managements, or other Federal Public Lands areas. (Federal Regulation Title 36, 2.22 (a))
Do not leave hearts in bathrooms, restrooms, washrooms, etc. (Unsanitary)
Do not leave in places where they may be thrown away by staff. (Super Sad)
A quilted heart that was found by a stranger.
You make the fabric heart and embellish it however you want. Then you add a small tag to it that says ONLY:
Don’t add ANY OTHER WORDS and the tag should be plain text. Here is the link to the group’s official printable tags. You can handwrite your tags if you need to, but don’t add words or artwork.
As you know, I am a longarm quilter. I often end up with extra fabric and backing on my frame at the end or on the side of a quilt and I realized that was a great opportunity to make a few hearts. And then I thought that more longarmers could do the same if they had some simple stitching designs that would be quick and easy to stitch out.
So. . . here we are… way outside my comfort zone, but I am going there anyway. I have designed three small heart designs that can be stitched on ANY longarm system that I am giving away FREE. They are not fancy and they are my first public offering of a digital stitch pattern- which is scary! I hope you will go download these and tell your longarming friends to get them as well. Let’s spread the world with tiny fabric hearts. They should stitch at about 4″ x 4″ but feel free to change their sizes.
The designs are totally FREE, but you do have to check out through The Shoppe so that the downloads can be delivered.
There are a few tips I can give you as a longarmer.
You can fit several designs in a 6″ border type area by flipping every other heart.
You can have pieced border strips ready to add at the end of a quilt.
Putting some of the hearts at diagonals totally changes how they look.
These designs are pretty small- you might want to put your stitch per inch up to about 16 to smooth out the curves- especially on the stipple heart.
FREE digital heart designs for you to use from Oh Kaye Quilting.
Every year at Handi Quilter Academy we have a theme. This year the theme was “CinemAcademy” and the whole experience was based on going to the movies. Each team of teachers is assigned a classroom to decorate and our team chose Harry Potter as our theme. We didn’t correlate our classes with the theme but we did decorate our room with all things supernatural.
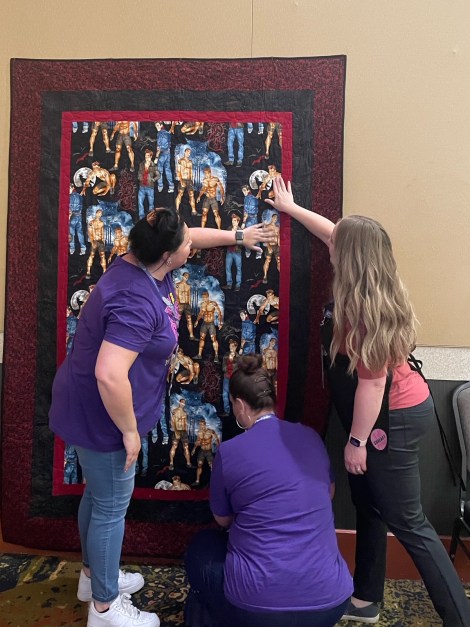
Twilight Quilt by Kristina Whitney
One of the big draws in our class was a “Twilight” quilt by Kristina Whitney who did a bit of trapunto on the chest of one of the werewolves. It was quite spectacular to see everyone feeling the quilt to find the enhanced six pack! I’ll admit it- I ran away at vampire speed when I noticed the cameras coming out!!! What a riot!
This is a simple quilt: she used a length of the novelty fabric and surrounded it with three borders. It is quilted with an Edge to Edge design but I can’t remember what it was.
The quilt I made for the classroom was a cheat by my standards! I bought a panel on Amazon and put an Edge to Edge design on it using Anne Bright’s Wizard’s Wear design. I didn’t even add any borders because I thought it would detract from the panel rather than adding to it. I did put a pretty cool backing on the quilt using fabric from the Space Glow line by Lewis and Irene.
Contact me if you are looking for the BACKING fabric. . . I have several yards available.
The panel is NOT cotton but that didn’t matter to me and it quilted up beautifully. It is polyester and comes in two sizes- a 70″ x 70″ and a 70″ x 90″. As we all know, prices on Amazon fluctuate but this item appears to be in the $19.99-$21.99 range so it is a great deal!
This is an affiliate link. When you use the link I receive a small percentage of the sale.
Although it didn’t take too long to make this quilt, it really has a lot of impact. I used 80/20 batting in it and I put the binding on while it was on my longarm frame and then finished the binding with my domestic machine. You can get a sense of the scale of this quilt seeing Shauna Westergard and I sitting in front of it during class.
If you make a panel quilt, share your work so I can enjoy it!
Potter Academy Quilt LabelGlow-in-the-Dark Fabric on back of Harry Potter Quilt